Monday 23 February 2015

Art journal page - Be yourself

Hi, everyone! I've been inspired to make another art journal page today :) All Tim Holtz stamps (mostly his classics stamps) except the one from Graphic 45 and the Bo Bunny mixed media stamp (for the border)...some sprays...a stencil...imagination and here it is :) so easy and fun.
Thank you for stopping by!

I am sharing this at amazing Brenda's blog Bumblebees and butterflies - A Visual Journey


Sunday 22 February 2015

Art journal page - Lucky number

Hi, crafters! My new art journal page is about my lucky number which is 5 :)
I used several different sprays and a lot of Tim Holtz stamps, actually I used only his stamps here. Also, I used two stencils in different ways - the Dylusions stencils - Numbers and Tim's arrows stencil (I traced the arrows through the stencil). I was inspired by Tim's awesome stamps (Bitty grunge set) to create this art journal page.
Thank you for visiting my blog!

I am sharing this page at Brenda's blog A Visual Journey


Thursday 19 February 2015

Art journal page - Discovering

Challenges:
Country View Challenges - Drips and Drops
Our Creative Corner - Tic Tac Toe Let's have some fun Challenge (Paints, Stamps, Stencils)

Hello! I finished my second art journal page today :)  inspired by two new Tim Holtz stamp sets ( Perspective and Watercolor) to make this page. I started with the modeling paste and my reversed chicken wire stencil. Then I covered the page with Tim Holtz tissue paper, put one coat of gesso and  painted the whole thing with the acrylics paints in blue tones. I used the Vintage photo and Walnut stain distressed inks on the edges directly from pad and sprayed it with water so that ink can bleed over the whole page. The I used the Archival ink in Sepia over the raised areas (chicken wire stenciled background) to get some accents.
I am sharing this at wonderful Brenda's blog A Visual Journey.

Sunday 15 February 2015

Art journal page - Simplicity

Hi, everyone!
 On this sunny day I decided to finally start with my art journaling :) I have a Moleskine sketch book for a while but I wasn't ready till today... So, here it is...
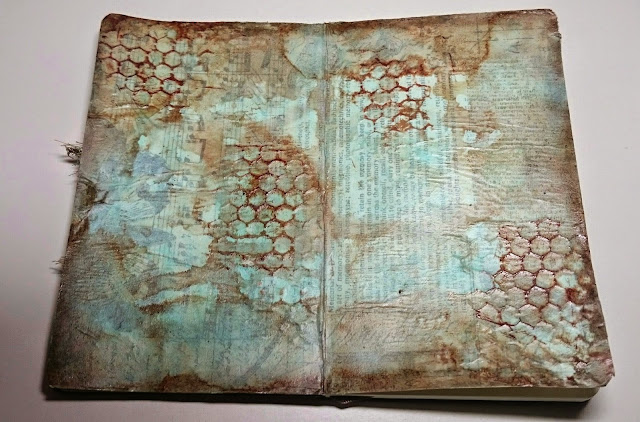
I started with the bronze paint + blue patina oxidant and then added gesso on the rest of the page. Then I sprayed all with several glimmer mists in blue tones. On the edges I used gathered twigs distress stain. I also used some distress paints mixed with the glaze all over the edges until I wasn't satisfied with the result. Since I haven't got any idea how the whole thing is supposed to look and having no plans about this page, I just started to add some paste with mica flakes through the burlap stencil here and there. The only thing I planned to use was the new Tim Holtz stamp set Perspective :) so I used the quote at the end...
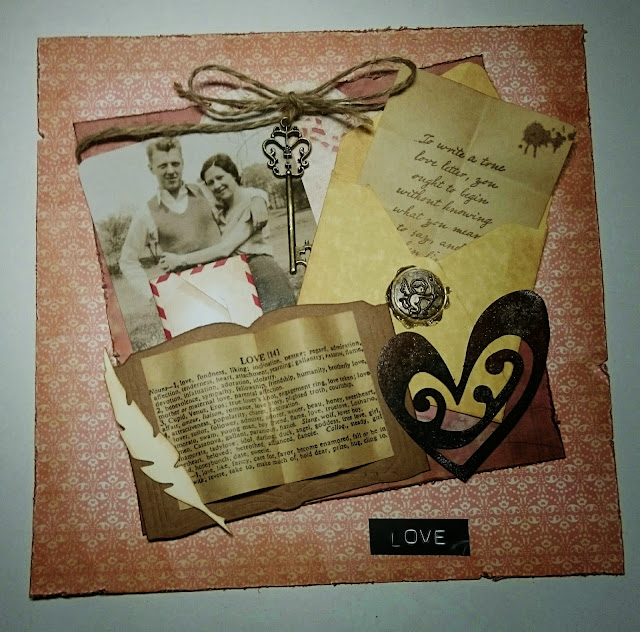
I stamped the edges randomly with coffe Archival ink ( the one of my La Blanche stamps) and stamped the date on the top of the page. The old picture I cut from the 7 Gypsies paper pad and then I attached the picture ( together with the chesse cloth and the wire ) to the page using my tiny attacher.The small metallic star is attached to the page with the tiny brad. I used Faber Castell big brush pen in brown color to add the shadow here and there. That is all :)
I am sharing this page at Brenda's blog A Visual Journey

Challenges:
Our Creative Corner - Tic Tac Toe Challenge  (Paints, Stamps, Stencils)

Wednesday 11 February 2015

A Dream metal plate

Hi, crafters! I have finally decided to use my Walnut Hollow creative metal tools to make this metal plate. I started with the black cardstock as a base. For the focal point I used the Tim Holtz Dream movers and shaper die which I cut from the light chipboard and glued down to my cardstock base. Also, I put some mesh self adhesive tape. Then I Covered the whole thing with my foil tape. Here came the Walnut Hallow tool in action :) to get the more realistics looking metal. To achieve the rusted metal look I used the black acrylic paint (Tim Holtz industrial technique) and then I went over with the some bronze paste. All the metal embellishments - the key, washers, button, pen nib, eyelet... (except the gears) are rusted with Crafty notions rust powder and a touch of a Vintage photo embossing powder. I used the Tim Holtz swivel clasps to hang the plate. I attached the wire with metal embellishments and I put a key at the bottom.

Challenges:
A Vintage Journey Challenge - Time to play Tic Tac Toe - Metal embellishment, Paint, Foil tape


Sunday 8 February 2015

CC3 Challenge #21

Hi! This is my first time I join the CC3 Challenge:) and I am so excited! I decided to make a tag and started with some distress stains for the  background. Also, I distressed the edges with Walnut stain distress ink. After that I used the Tim Holtz Rock Candy Distress Glitter technique (described in Compendium of Curiosities 3 by Tim Holtz, page 55). The Layered butterfly die I cut from the black heavy cardstock and sprayed with various Perfect Pearl mists and then went over with gold rub'n'buff. I cut the butterfly in half and attached the cork vial with the piece of wire. I put the wire spring inside the vial. The two pieces from the other half of the butterfly I glued on both sides of the tag. On the top of the tag I put the seam binding distressed with different distress paints. On the bottom I attached the word band with burlap twine. All the supplies I used you can find at the INSPIRATION EMPORIUM store.

Thursday 5 February 2015

Tim Holtz 12 tags of 2015 - February

Hi, crafters! I made the tag for February this year. The Tim's verison you can find HERE.
My version is different but I used all the techniques he showed :)

Sunday 1 February 2015

My scrap room - wardrobe makeover

Hi! This is how my scrap room is look like. It is a very small space but I feel mayself comfortable. Since I have more and more supplies I think I am going to use more space at the gallery in my house in the future :). This room was a wardrobe earlier and since we have two kids I couldn't get any of our other rooms for my crafting space than to sacrifice my wardrobe. You can see how I store my supplies and how I organized my small crafting space :).

Valentine layout

Hi! For this layout I used Sweet sentiment (g45) paper and mostly Tim Holtz embellishments. I made an envelope from papirus and put the wax stamp on it. For the letter I used Tim Holtz Love letter stamp. The heart Tim Holtz die I covered with several different distress embossing powders from Ranger. I put the burlap twine to hang the key. Also, I used the photo from Tim Holtz Occasional cards and for the book I used Marianne Opened book die and I just stamped the Love stamp on the paper and glued it on top with foam tape. I hope you like this :)

Challenges:
Simon Says Wednesday Challenge - Anything goes
Frilly and Funkie Challenge - Be my Valen-Twine
A Vintage Journey Challenge #24 - Love is in the air