Tuesday 15 December 2015

Altered photo frame

Hello, crafty friends!
I am back today to share with you my new altered frame I created as a present for my dear friend! 

Saturday 12 December 2015

A Singing Bird - art journal page

Hi, lovely friends! 
A warm welcome to my new and my old followers! I hope you are doing well! 
Today, I would like to share with you my folk art mixed media art journal page!


I used Amsterdam acrylic paints, Dylusions paints, a piece of an old music notes sheet, my Molotow acrylic markers, Gallery Fluorescent oil pastels, my Stabilo All pencil in black, Inktense pencils, Gelatos and my White Sharpie. 
I used my fingers to apply the paint, except for the face where I used my brush :) 

Thank you so much for stopping by and for leaving sweet comments! 

Challenges:

Saturday 5 December 2015

Anything But Cute Challenge #8

Hi, crafty friends!
I hope you are all health and safe! Most of us are in the middle of creating Christmas cards for our relatives, friends and our loved ones! If you are one of those who love creating these than there is a wonderful challenge theme for you starting today at Anything But Cute - You've Got Happy Mail!


For this challenge, our super talented Niki would love to see some mixed media Christmas cards, tags, ATCs or whatever papercrafts you are mailing to a friend, inspired by the Spirit of the Season!

I wanted to add some untraditional Chrismas colors to my card so I used pink color and here is my card I created for this challenge:


Tuesday 10 November 2015

Finnabair inspired birthday card

Hi, friends!
I am back today with a quick post. I was inspired by Finnabair artwork to create a card for my lovely blog friend and my teamie Samra (Paper Talk With Samra). 
I used my Distress stain sprays, Lindy's sprays, Perfect pearl mists and some glimmer mists here.
Also, I used micro beads, Finnabair art ingredients, some ebellishments from my stash and a Sizzix die cut.
Thank you so much for stopping by and for leaving sweet comments!

Thursday 5 November 2015

Anything But Cute Mixed Media Challenge #7

Hello, everybody!

It's 5th of November already and it's time for our new challenge at Anything But Cute Mixed Media Challenge blog! Our talented Cec is hostessing the challenge for this month and she has chosen the theme 'It's Ornamental'!

Since the holiday will be coming up pretty quickly, Cec would like you to create a mixed media ornament for your Christmas tree or a Christmas decor item for your house or table.

Please head over to our challenge blog by clicking on the picture bellow to check out what my super talented teamies have created for this awesome challenge! 


I like to decorate my home for Christmas in vintage style so I decided to create a shabby wall hanging for my craft room and here is what I came up with:

Tuesday 3 November 2015

Mixed Media Face

Hello, friends!
I am back today with a quick post. This mixed media face I created for my lovely crafty friend Nika ( Nika in Wonderland) whose brilliant art work inspires me all the time! I encourage you to visit her blog and her You Tube channel for a great inspiration! 


To create this piece I used my Faber Castell Pitt Artist pastel pencils and Stabilo Carbothello pencils, as well as my Kuretake Gansai Tambi watercolors. I also used two dies from Tim Holtz - Layered Leaf and Tattered Leaves along with the matching embossing folders to add some texture. The leaves were colored with my Lindy's sprays and some Distress ink sprays. I applied some Inka gold on the leaves. The quote was stamped using my Archival ink in black. 

Thank you for visiting my blog and leaving sweet comments! 

Hugs! Branka x

Monday 26 October 2015

Anything But Cute Sneak Peek

Hello, everybody!

If you love to play with Dylusions paints like I do you are going to like a tutorial posted on Anything But Cute today! If you are not familiar yet with those paints you are going to find out what kind of acrylics paints they are. Here's just a sneak peek of a tutorial posted on Anything But Cute.


So head over and see everything you wanted to know about these amazing paints! I am going to show you how to use them and some tips and tricks! 

Hugs!
Branka xxx


Wednesday 21 October 2015

Mixed Media Face Birthday card

Hello, crafty friends! 
Just a quick post today to share with you a birthday card I created for my lovely blog friend and a teamie, Pamellia (My Little Craft Things). 
I decided to draw a face and I used my soft pastel pencils (Faber Castell Pitt pastel pencils and Stabilo Carbothello). I also used my Kuretake Clean Color Real Brush pens on the flower. 
The sentiment was stamped using my Archival black ink.
To add some texture I created stars using my stencil and a mica flake paste in pearl. 

Thank you for visiting my blog and leaving sweet comments! It means much to me!

Hugs! Branka x


Challenges:


Thursday 15 October 2015

A Dreamcatcher Birthday card

Hello, crafty friends! First, I would like to appologize for my absence here since I was busy renovating my house. Now, it's all settled and I am back to share with you a Birthday card I created for my cousin who lives in the USA. 
I was inspired by Vicky's art journal page ( Clips N Cuts ) to create this Dreamcatcher card and I used my Dylusions paints for the background. 
I also used my Embossing paste and a stencil to create a dreamcatcher body and my Tim Holtz die to cut those feathers. I colored them with my gelatos and for the shading I used my Faber Castell big brush pen in turquoise. I added some flat back pearls, strings, handwritten quote and a sentiment using my Simon Says Stamp clear stamp. 

Thank you so much for visiting my blog and leaving sweet comments! It means much to me! 

Challenges:

Monday 5 October 2015

Anything But Cute mixed media challenge #6

Hello, everyone! First, I would like to welcome my new lovely followers and to thank to my 'old' ones! Your great support means so much to me!

Today is 5th of October and it's time for our new challenge #6 at Anything But Cute mixed media challenge blog! This time, our hostess is my lovely teamie and blog friend, super talented artist, Sara Emily
She just love Halloween so much and she would like you to make a mixed media card or other project for Halloween. It can be spooky or not, but you MUST include the number "31" somewhere in your projectWe can't wait to see the creative ways you'll be incorporating this number in your mixed media piece!
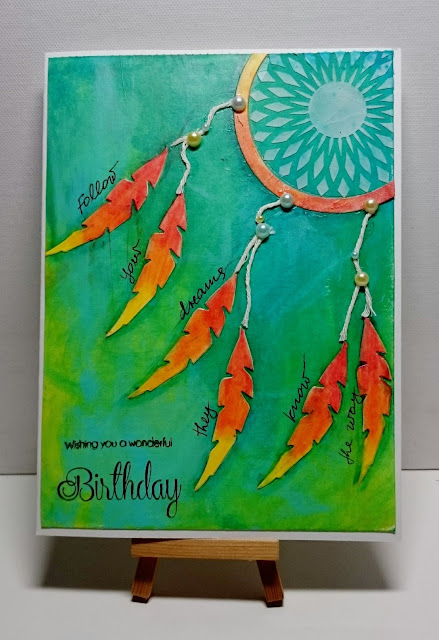
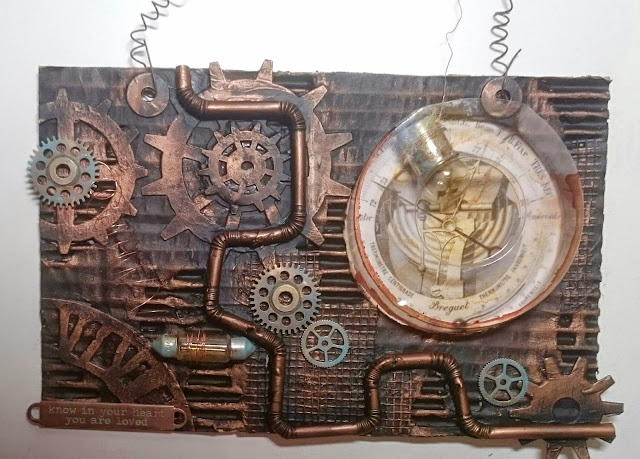
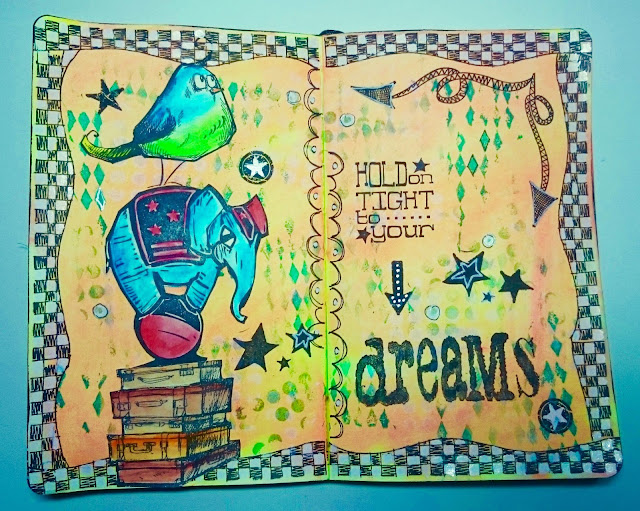

was in the mood to create something funny so I decided to use some of my Dylusions supplies for this awesome challenge theme! I pulled out my big Dylusions journal, my Dylusions paint (favourites), Dyan's stamps, stencils, Dylusions ink sprays, my alcohol markers, some of my acrylic markers, white and black Sharpies and started to play. I enjoyed a lot creating this :)

Here is what I came up with:

Saturday 5 September 2015

Mixed Media Makeover challenge at Anything But Cute

Hello, crafty friends! It's time for our challenge #5 at Anything But Cute mixed media challenge blog! Our talented hostess Niki has chosen the theme 'Mixed Media Makeover'.


Pull out an old card, tag, project, masterboard or embellishment that you weren't completely happy with or never completely finished. Niki wants you to recycle it. We all make "mistakes" with our art right? Now's your chance to fix it. Redo it, hide the mistake, make it bigger, make it better, make it more beautiful or rip it apart and use the pieces! Give it a mixed media makeover! For this challenge you will need to include a before picture so we can see what you started with.

Here is what I started with:
Some time ago I created an art journal page which I never liked. For this amazing challenge I decided to finally recycle it.  

Tuesday 1 September 2015

Altered photo frame

Hello, crafty friends! I am back today to proudly announce my Guest DT appearance at Rhedd's Creative Spirit for their September challenge.
I would like to encourage you to check out their amazing challenge blog and get a lot of inspiration from the wonderful DT! 

I was inspired by Finnabair's art (what a surprise haha) and decided to alter a photo frame that I bought some time ago at our local gift shop. I put one of my downloaded vintage photos (Paper Whimsy) inside of the frame and started adding embellishments. I used some metal roses, paper flowers and even some of my fabric ones. I also added some small wooden details. When I finished with the embellishing I covered the whole frame with a coat of black gesso. I used a lot of metallic paints, Inka Golds and my antiquing pastes to achieve that metallic look and I like how this turned out. 

I'll be back on Saturday to share with you my new project for our challenge #5 at Anything But Cute

Thank you for visiting my blog and leaving sweet comments! 
Have a great day! 


Thursday 13 August 2015

A Bird Song - mini art journal page

Hi, crafty friends!
I was so inspired to create another mini art journal page using my oil pastels and Dylusions paints. This time I decided to use more vibrant colours and to draw a bird by myself :) As you can see, my bird is so simple that everyone can draw :) It's not my original idea, I picked this way of drawing a bird from YT (I am sorry I can't remember from who). 
To prepare my pages I glued down pieces of some old music note sheets and put a coat of white gesso on top of it. Then I used my Dylusions paint, Dylusions spray inks and some of my Golden acrylics paints to create the background.
The quote is actually a Dina Wakley stamp from her Scribble birds stamp set. I used several stencils here (Dylusions and TCW) to add some more details to my background. I also used a Paper Artsy mini stamp with my black Archival ink randomly. For shading, I used my black Faber Castell Pitt Artist pencil. To colour the bird I used my oil pastels and I added some doodling here and there.

Have a great day and thank you for stopping by! Hugs!

Wednesday 12 August 2015

Pretending - art journal page

Hi, friends!
 I decided to challenge myself in creating small art journal pages. So, I pulled out my mini art journal (3.5 x 5.5) and started creating my background using my distress paints, watersoluble crayons, Dylusions paints and my oil pastels. This was my first try to draw a face using oil pastels and it was sooo fun :) I used two Dylusions stamp sets here - one for the quote and one for the border. I also used my Uni Posca pens in black and white to colour the stamped border. For shading I used my Stabilo Carborhello pencil in black.

Thank you so much for visiting my blog and leaving sweet comments! It means much to me!

Have a wonderful day!

Challenges:
The Mixed Media Monthly Challenge blog - Get Texty challenge

Wednesday 5 August 2015

Making Magic - Anything But Cute challenge #4

Hello, my friends! I am here today to announce that our challenge #4 has just started at Anything But Cute mixed media challenge blog!
Our wonderful Georgie has chosen the challenge theme 'Making Magic'!

Most of us are drawn to the magic of fairy tales and fantasy. The colours are often hypnotic and your mind is free to explore outside the limits of reality. For this challenge, Georgie would like you to create a magical mixed media project strongly inspired by the moodboard. Be inspired by the theme, the colours, the textures or all three. Lets bring a little magic back! 

Click on the mood board bellow and check out more about our August challenge!

Tuesday 4 August 2015

ART - art journal page


Hello, my crafty friends! I am honored and thrilled to announce my appearance as a Guest DT today at Try It On Tuesday for their fabulous challenge 'Use Stencils'! I hope you will join the fun and enter the challenge! 

 I decided to use an old book as an art journal and to create this page. I used a Dylusions stencil (squares) on gessoed background with my Golden crackle paste and a lot of distress sprays, inks, some Lindy's stamp gang sprays and micro beads. Also, I used Tim's mesh stamp on the background. The focal image is from Paper Whimsy printable collage sheet. I added some metal embellishments aged with some distress paints. I used small talk Idealogy stickers for a quote. 

Tomorrow is going to start our challenge #4 at Anything But Cute mixed media challenge blog so don't miss it! 

Have a great day and thank you for stopping by!

Wednesday 29 July 2015

Fly - art journal page

Hello, friends!
 My new art journal page is ready to be shared with you. I used Dylusions paints and some Liquitex basics paints on the background and a lot of stenciling. To blend the colours I used my Dylusions spray inks. I glued down some pieces of Idealogy tissue paper to add more details. My  images were stamped on a tissue paper and applied with Ranger multi matte medium. The quote was printed out on my computer. I used my Faber Castell charcoal pitt pencil around the edges and my Uni posca marker to add those white splashes.

Thank you for stopping by and leaving a sweet comment!
Have a great day!

Sunday 19 July 2015

Mixed media collage art journal page

Hello, my friends! Another art journal page from me today and I decided to create a collage inspired by Linda Iversen's fabulous art at LivArtNow. I used an old book as an art journal just for fun :) and prepared the pages using black gesso. Then I applied my modeling paste through the checkers stencil. I used a lot of DS sprays and some Lindy's stamp gang sprays on the background areas covered with white gesso (I applied white gesso around the areas with checkers pattern to be able to use my spray paints). To add more texture I used my The Crafters Workshop stencil and my texture paste in green tone. I used some free printable images and Paper Whimsy girl image as well as stamped images  (Paper Artsy, Finnabair, Tim Holtz, La Blanche) for collaging. All images are sealed with Ranger Multi Matte Medium and I used my Faber Castell Pitt Artist Big Brush pens for shading.

Tuesday 14 July 2015

You Are Loved - art journal page

Hi, crafty friends! I am back today to share my new art journal page with you. I was inspired by amazing Nika in Wonderland's art again :) I used Andy Skinner's stencil, My Favourite Things stencil, Dylusions paints, Dylusions inks, gelatos, Neocolor II pastels, Tim Holtz stamp and Jane's Doodle stamps for quotes. 
Thank you so much for stopping by and leaving a sweet comment! 

Challenges:


Sunday 5 July 2015

Anything But Cute challenge #3 - Summer Romance

Hello, my crafty friends! It's 5th of July already and our challenge #3 has just started at Anything But Cute Mixed Media Challenge Blog, today! This month our hostess is amazing Samra who has chosen the perfect theme for this time of year - 'Summer Romance'!
For this challenge, Samra would love to see projects with a romantic theme a beach/sea theme or both, BUT they must be strongly inspired by the colors of the mood board. For this challenge you MUST display our graphics badge in your post along with our blog name and challenge link.
More details about this challenge you can find at Anything But Cute Challenge Blog. Just click on the image bellow and you'll be redirected there where you can check out fabulous makes of my super talented teamies and I sure hope you'll join us in our 'Summer Romance' July challenge! 

Sunday 28 June 2015

Everything is possible - art journal page

Hi, crafty friends! I am back today with another art journal page. I used several TCW stencils with Archival inks and My Favorite Things one (cogs and gears) with my Liquitex Light modeling paste. A lot of spraying with my Distress stain sprays, Perfect pearl mists and glimmer mists has been used there. Cogs and gears are Xcut dies treated with some Galleria sand paste and several acrylics paints. The focal image is Paper whimsy digital image and I stamped two images (a hot air balloon and a sun) with black Archival ink on a manila cardstock. The wings are part of a butterfly (Tim Holtz's butterfly duo die) which has been sprayed with Distress stain sprays and Perfect pearl mists and distressed with Vintage photo DI. I used Idealogy small chit chat stickers for the quote.
Thank you for stopping by and leaving a sweet comment!

I am sharing this page at Bumblebees And Butterflies A Visual Journey #25

Saturday 27 June 2015

Face - art journal page

Hi, friends! Today, I would like to share with you my first attempt to draw a face :) I thought I can't draw and then I followed Dina Wakley's tutorials in her book and I realized that this was not so difficult as it seemed to be haha :) I have been inspired by Nika in Wonderland's art to create this art journal page. So here it is:


I used Dylusions paints, TCW stencils, Derwent Inktense blocks, watersoluble sketch pencil in black, Uni Posca white marker, Faber Castell black fine tip marker, Dyan Reaveley's stamp for a quote...I like how this page turned out since this is my first attempt ever in drawing faces (if I don't count drawing during my childhood). 
Thank you for visiting my blog and leaving a sweet comment! 


Challenges:
Our Creative Corner June challenge - What Makes You Smile - When I learn something new it makes 
me smile :)

Wednesday 17 June 2015

Dylusions black border art journal page

Hi, lovelies! First, I would like to welcome my new followers! Thank you all so much for supporting me! Just a quick post to share with you my new Dylusions art journal page I created for Dylusions facebook challenge and for this month we need to use Dylusions border in black.
I used my Dylusions small journal, Dylusions paints (I mixed some of them to get various tones), stencils and stamps.
Thank you so much for visiting my blog and leaving sweet comments!

Challenges:

A Sprinkle Of Imagination monthly challenge blog - June challenge (I used Dylusions paints, stamps, stencils)
Mixed Media Monthly challenge blig - challenge #13 - A Year of Choices - I picked challenge #6 - Stamps (I used several Dylusions stamps)

Our Creative Corner - What Makes You Smile challenge (I used a Dylusions stamp with a quote that makes me smile a lot, as well as that funny stamped image. Also, art journaling always makes me smile)
Art Journal Journey June challenge - Masculine/Feminine


Friday 12 June 2015

Memory - art journal page

Hi, crafty friends! I am back today to share with you my 'Memory' art journal page I've created for Linda Ledbetter's Compendium of Curiosities 3 challenge #30 . This challenge is about the Faux cracked glass technique (described in Tim Holtz's Compendium of Curiosities 3, page #54). The generous sponsor of this challenge is The Funkie Junkie Boutique. I've started with several DI for the background and some stamping and stenciling using several different Archival inks. The stencils I used are from TCW and Tim Holtz. Most of the stamps are from Tim Holtz and I used two of Paper Artsy's. I used the faux cracked glass technique on a piece of acetate from one of the Alterations packagings. I used some Deco Art Media products to achive the patina effect (Andy Skinner's technique) on Pocket watch die.

Challenges:
Try it on Tuesday blog challenge - Watches and Clocks
Eclectic Ellapy challenge blog - Purple team - Steampunk
Altered Eclectics June challenge - Anything goes
Art Journal Journey challenge - Masculine/Feminine
Moo Mania June challenge - Anything goes

Friday 5 June 2015

Anything But Cute challenge #2 - Make It Masculine

Hi, friends! I am here today to announce that our June challenge has started at Anything But Cute Mixed Media Challenge blog!
Our hostess Cec has chosen the theme 'Make It Masculine'.

For this challenge, Cec would like you to make a mixed media card or other project for a fellow in your life. It could be for Father's Day, a birthday, an anniversary or just because you want him to know how special he is. 

Please head over to our Challenge blog to check out fantastic makes of my fabulous teamies and I sure hope you'll join us in our 'Make It Masculine' challenge. Just click on the image below and you'll be there :)


I decided to create a stempunk style cardboard hanging plate with cogs, gears and pipes for my son who is one of the three special men in my life - the other two are my Dad and my husband :)

Shabby chic altered clipboard

Hi, lovelies! I am proud to announce that I was invited to be a guest DT at fabulous Country View Challenges blog!
When I have got an email from Chris (Country View Challenges DT) to join them as a Guest DT for their 'Shabby Chic' challenge, I was in heaven!
I decided to alter a clipboard for that wonderful theme chosen by amazing Astrid.

Thursday 28 May 2015

Paris scene card

Hi, friends! I am here today to share with you my Paris scene card. I started with a piece of manila cardstock and my distress stain sprays in brown tones. When it dried I stamped the lady (Tim Holtz's stamp) and made a mask. I put the mask over the lady stamp and then stamped the cityscape Paris image. The lady image was coloured with my Cracked pistachio and Victorian velvet distress stain sprays (I used my water brush). I used my 2" circle punch to make a stencil and then I applied Mustard seed DI through that handmade stencil to achive a kind of light shadow from the lamp or the Moon :) The lamp post (Tim's Bigz die) was cut out from the black cardstock as well as the bicycle (Cottage cutz die). I used one of Tim's stamps (birds) to add more details to the scene. Also, I used my black Archival ink for stamping and for distressing the edges I used two of my DI's Brushed corduroy and Black soot. I used my Big chat stickers for a quote.

Challenges:


Wednesday 27 May 2015

Tim's May 2015 tag

Hi, lovelies! I would like to share with you today my version of Tim's May tag. As you all know, the original one can be seen HERE. I didn't have textured surface/burlap so I used a piece of burlap that I had in my stash, glued down with glue n' seal on a piece of manila cardstock and when dried cut out using my tag & bookplate die. I followed Tim's tutorial and used all the techniques he showed. I used different ephemera pieces than he used and since I didn't have tiny tattered floral die I used my decorative strip die (tattered floral) to make a flower and leaves and added two little roses from my stash.


Thank you so much for taking the time to visit my blog and leaving a sweet comment!
Have a great day!
xxx

Monday 25 May 2015

Compendium of Curiosities 3 Challenge #29 - Eroded metallic

Hi, all! I would like to share my new card with you today and to welcome my new followers! I was inspired by Linda Ledbetter's Compendium of Curiosities 3 Challenge #29 Eroded metallic sponsored by fabulous Inspiration Emporium and started with a piece of cardboard, my brick stencil and Liquitex Light modelling paste. I applied the paste through the stencil randomly and then put one coat of gesso. Then I sprayed it with several different distress stain sprays and I applied Black soot distress ink here and there. I cut the arch from a manila tag (Tim's die) to create my door and I used Tim's Eroded metallic technique (described in Compendium of Curiosities 3, page 44) on there. To add more texture, I embossed it using  one of Tim's embossing folders. Then I cut the frame around the arch from the light weight chipboard, sprayed it with distress stain spray in Old paper and stamped it using one of my Bo Bunny's mixed media stamps and black Archival ink. The edges were distressed with Black soot distress ink. I attached Ideology key hole with fasteners and I used two fasteners to attach the door. The old key from my stash is hanging on a swivel clasp connected to the back side of my card base. For the quote I used a piece of kraft cardstock stamped with Tim's woodgrain stamp and coffee Archival ink. Also, I distressed the edges with Black soot distress ink.

Challenges:
Simon Says Stamp Wednesday challenge - Stencil it

Friday 22 May 2015

Curiosity - art journal page

Hi, all! My new art journal page is ready to be shared with you :) I used baby wipe to apply the Dylusion paints on my background and then just cleaned one of my stencils between the pages (the stencil was used on another project with Dylusion ink) and I have got a pretty interesting result - you can see those purple shapes on the background :) To add more details I stamped the background randomly using my Paper Artsy mini rubber stamps and Black Archival inks. I also, stamped the border (can't remember which stamp I used there) and I used a lot of distress inks, stamps, stencils and Archival inks to create those two tags. The quote (Tim's rubber stamp) was stamped on a manila cardstock, distressed with distress inks and glued down. I added some black and white circles here and there and some doodling.


Tuesday 12 May 2015

Multiple personalities - art journal page

Hi, friends! I would like to share with you my art journal page I've created after doing an online class (Innovative ink - colorful mixed media effects) with absolutely one of the best artists Marjie Kemper! For those of you who might be interested in this class HERE is the link.
I used a lot of distress inks, stencils/masks, Dylusions paints and some stamps there and I love how this turned out :)
Thank you so much for taking the time to visit my blog and leaving a comment!

I am sharing this page at Brenda Brown's Visual Journey #19

Challenges:
We Love to Create - Challenge #10
Not Just Cards Challenges - challenge #19


Sunday 10 May 2015

Dylusions art journal page - brayer technique

Hi, all!
I am here today to share with you my new art journal page. I used a lot of Dylusions products there - paints, inks, stencils and stamps. Dylusions paints are really special, love them so much. I used Dyan's brayer technique on the background and three of her stamps to create a character. Stamped images are coloured with Dylusions inks and my new Molotow Aqua ink pump softliners. Those markers are just amazing :)
I had a lot of fun creating this :)

I am sharing this page at fabulous Brenda Brown's Visual Journey #19.


Tuesday 5 May 2015

Vintage Garden Challenge at Anything But Cute blog

Hello, friends! I am so happy and excited today as our first challenge ever has started at Anything But Cute mixed media challenge blog and I have an honor to be the first hostess there! Our first challenge is 'Vintage Garden'. 


What do you think of when you hear the word Garden? Is it flowers, birds, butterflies, dragonflies, bees, lattice, vines, fences? Whatever garden vision you have, we want to see it. But make sure it's in a vintage style.

I was inspired by my past memories to make a reverse canvas and this is what I started with.
I put one coat of gesso on the borders and then used my brown acrylic paint over it. To achieve a worn look I went over it with my cream acrylic paint randomly.

Monday 4 May 2015

Art journal page - Bloom where you are planted

Hi, friends! I was inspired by the two new fabulous Tim's stencils (Blossom and Wildflower) and beautiful May flowers in my yard to create art journal page 'Bloom where you are planted'. I used three different distress paints - Cracked pistachio, Mermaid lagoon and Peacock feathers on the background previously treated with gesso. On the upper corner I used Tim's stencil and yellow Dylusions paint. Then I stamped the leaves and colored them with my gelatos in green tones (watercolor technique). I wanted to achieve a watercolor effect for my flowers and I used those two Tim's new stencils and several distress inks (I actually used my sponge dabbers with inks through the stencils). The butterflies were stamped with black Archival ink and then colored with gelatos in the same way as the leaves. Also, I used black Archival ink to distress the borders and for the quote.

I'll be back tomorrow with a new post :) Don't miss it!

Challenges:


Art journal page - Red, Blue and Stars


Hello, my friends! I am sharing with you today my art journal pages I created for the Dylusions Facebook Challenge a few weeks ago. It was the April challenge and we had to use only red and blue colors and stars. I decided to go with my black journal (yes, I have one :) small but black) and I used my brayer to apply the Dylusions paints on the background. For the stars, I used one of the Dylusions stencils and black and white paints and then I also doodled through the stencil with my white gel pen. The legs were stamped with black Archival ink on white cardstock, cut out and glued down. I outlined the images with my white pen then stamped the quote (Dylusions stamp) and change it a bit :) 
Thank you for stopping by to visit my blog and leave sweet comments!


Thursday 23 April 2015

Vintage tag - Home

Hi, everyone! I am back to share my new vintage tag with you. I made this while my daughter was having her lunch :) It was easy and fun to make. I used kraft tag and applied the white acrylics paint randomly. On top of that base I used Tim's cracks stamps with coffe  Archival ink and stamped here and there to get some texture. Then I stamped the focal image (LaBlanche stamp) with black Archival ink and add the quote. I put a metalic corner and some of Tim's Idealogy goodies to embellish the tag. That vintage looking ribbon is from my stash. For a final touch, I draw the lines on the borders using my detailed Faber Castell marker.
Thank you all for taking the time to visit my blog and leave a sweet comment! It means so much to me.

Challenges:
Country View Challenges - Use kraft card
Stamps and Stencils Challenge blog - Anything goes
A Sprinkle of Imagination blog - April Challenge

Color your world - art journal pages

Hi, friends! We have a beautiful spring here in Croatia which inspired me to make these art journal pages. For the background, I applied Dylusions paints with the baby wipes. Then I used Dylusion ink through the stencil. I cut the border on four pages using my new Dylusions block which helps me to trace the shape. I treated those four pages in the same way as my background and then glued them together. I didn't want them to look as one page so I applied the glue only on a few spots. That's way they look like separate pages. I used stamping and doodling through the stencil on the borders. The flowers and the bird were stamped on a manila cardstock and colored with my gelatos (watercoloring technique), cut out and glued down. I used Gelatos to color the leaves, as well. To add some more interest I used my white gel pen to doodle through the stencil. I like how this turned out :)

I am sharing this at fabulous Brenda Brown's Visual Journey #17

Wednesday 22 April 2015

My creation for Our Creative Corner

Hi, friends! I am here today with great news to share with you! I am so proud and thrilled I have been chosen as a Top talent for Our Creative Corner! I was inspired by my absolutely favorite Tim's stamp set Birds crazy! Love, love, love that stamp set!
I started with stamping the images with black Archival ink on a manila tag, colored them with my watercolor crayons and cut them out. For the background I applied several acrylic paints and blended them with my baby wipe. To add some texture I used two Dyan's background stamps (harlequin and lego) and stamped randomly on the background with two different Archival inks in green tones.
When I glued my images down I added more details using Tim's stamps (stars and the little arrow) and doodled a little here and there with my white gel pen. The border was stamped with Dyan's border stamp and I used one of her border stamps in the middle of the pages, as well. I used Tim's stamps to stamp a quote.

Tuesday 21 April 2015

Smudge stamping technique tag

Hi there!
I would like to welcome my new followers and to share with you my entry for the fabulous Linda Ledbetter's Compendium of Curiosities 3 Challenge #26. This time we had to use the Tim's smudge stamping technique which is described in his Compendium of Curiosities 3 (page 42) and the generous sponsor for this challenge is The Funkie Junkie Boutique. I used one of my LaBlanche stamps for the focal image and a lot of Tim's stamps. The butterfly was sprayed with Perfect Pearl mists and some distress spray stains. I used several DI for the smudge stamping technique and to add some accents I used Tim's new star fasteners and a game spinner. The seam binding is hand dyed.

Friday 17 April 2015

Mixed media steampunk canvas

Hi, everyone! I am here today to show you my new creation as a Guest DT member for the amazing A Vintage Journey Challenge blog! I am so honored to have such an awesome opportunity!
I decided to use a canvas (reversed side) and to applied two coats of iron paint on the edges. After it dried I put a coat of rust oxidant on top of it. I used Tim's Measured stencil and red-brown paste on the border. For the background I cut a piece of black cardstock and used two Tim's embossing folders (Clock and Gears) and got a pattern I wanted. The metallic look is achieved with the help of several different Perfect pearl mists on there. I stamped the eye image (Tim Holtz classics #12 stamp set) with black Archival ink on a manila tag, cut out and put a Tim's monocle on top. All the embellishments I used there were mostly by Tim Holtz and I also used some findings from my stash as well as the small light bulb. The quote was stamped on a manila tag (one of Tim's stamps) cut out and glued down on the bottom. The fasteners were rusted with Crafty Notions rust powder.